
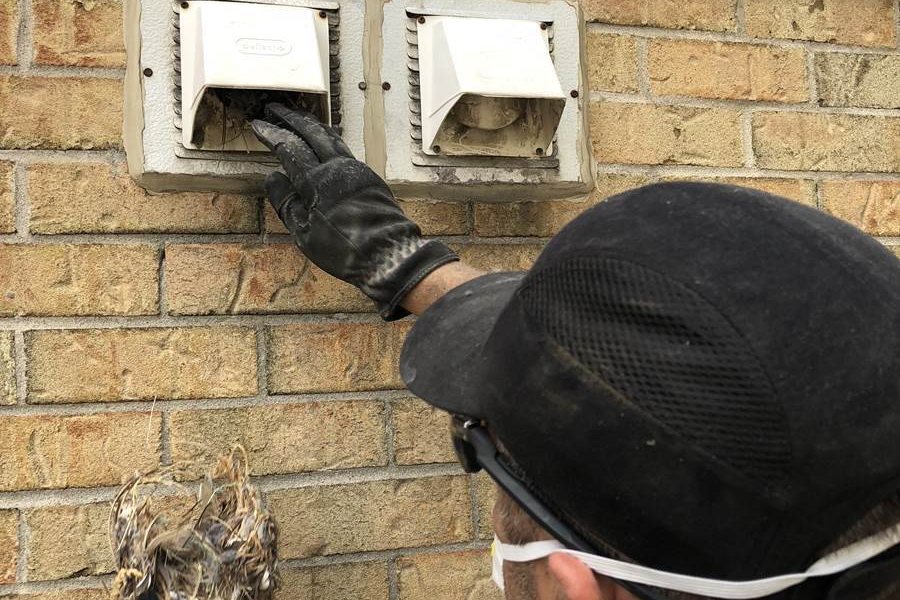
Here is how to clean a dryer vent yourself: unplug the dryer, pull it away from the wall and disconnect the transition duct. Vacuum the dryer outlet, run a rotary brush through the vent line from inside and from the exterior hood, and clear the hood flap. Then reconnect with clamps and foil tape and check the airflow outside.
Most GTA houses with a short run to an outside wall can do this with a basic kit. Below: the tools, the steps inside and outside, the right transition duct, winter hood problems and when DIY stops making sense.
Can You Clean a Dryer Vent Yourself?
Yes, in many homes. A main-floor or basement dryer that vents straight out the wall, with a few metres of pipe and one or two elbows, is a reasonable job for anyone comfortable with a drill.
Dryer vent cleaning means removing the lint that slips past the lint screen and settles in the duct. That lint slows the airflow and makes the dryer run longer and hotter, and U.S. Fire Administration data lists failure to clean as the leading factor in residential clothes dryer fires.
Long runs, roof or second-floor exits and condo ceiling runs are different. For those, professional dryer vent cleaning is usually the better call.
Tools for DIY Dryer Vent Cleaning
Most of this comes in a hardware-store dryer vent cleaning kit.
| Tool | What it is for | Our tip |
|---|---|---|
| Long, narrow lint trap brush | Cleans the lint screen housing inside the dryer | Twist it gently; do not force it. |
| Rotary brush kit with flexible rods | Spins through the vent line and breaks up packed lint | Get enough rods for the whole run, plus one. |
| Cordless drill | Drives the rotary brush | Forward (clockwise) only, at low speed. Reverse unscrews the rods inside the wall. |
| Shop vac with a narrow nozzle | Pulls loose lint from the dryer outlet, the pipe and the hood | Empty it outside afterward. Dry lint burns easily. |
| Screwdriver or nut driver | Loosens duct clamps and hood screws | A nut driver is faster on worm-gear clamps. |
| Metal foil tape | Seals the joints when you reconnect | Not cloth duct tape, which dries out and peels in the heat. |
| New transition duct and two clamps | Replaces a crushed, foil or plastic connector | Semi-rigid metal, 4-inch, as short as the space allows. |
How to Clean a Dryer Vent From Inside, Step by Step
Unplug first, and leave the gas line alone
Unplug the dryer. An electric dryer has a large 240-volt plug; a gas dryer still has a regular power cord for the drum motor and igniter.
With a gas dryer, do not disconnect or touch the gas line, the flexible gas connector or its shut-off valve, and move the dryer only as far as the connector reaches without stretching or kinking. A disturbed gas connection is a job for a licensed gas technician. A rotten-egg smell at any point means gas: leave the house without using light switches or phones and follow the Enbridge Gas emergency steps, calling 1-866-763-5427 or 911 from outside.
The inside steps
- Clean the lint screen. Roll the lint off, then run the long brush and the vacuum nozzle down into the screen housing. A slot that looks clean usually gives up a wad of grey felt.
- Pull the dryer out a few inches at a time, watching the duct behind it and, on a gas dryer, the gas connector.
- Disconnect the transition duct. Loosen the clamps at the dryer and at the wall pipe and slide the duct off. Old foil tape usually needs a utility knife.
- Vacuum the dryer exhaust outlet. Lint often sits in the round outlet on the back of the dryer in a matted, slightly damp ring.
- Clean or replace the transition duct. Shake it clean outdoors, or replace it if it is crushed, torn, plastic or foil.
- Brush toward the outside. Remove the exterior hood cover first so the lint has somewhere to go. Feed the brush into the wall pipe, run the drill forward at low speed and add rods as you go. Every metre or so, pull back and vacuum what comes out.
- Work the full length. When the brush reaches the hood, run it back and forth through the whole line, then pull it out slowly while it is still spinning.
Never force the brush through a hard blockage. Pushing harder packs the lint into a tight plug at the next elbow. Back off, vacuum, and try again from the outside end.
How to Clean a Dryer Vent From Outside
On most bungalows and two-storey houses with basement or main-floor laundry, you can clean the exterior dryer vent from the ground or a short step ladder.
- Open the hood. Remove the cover screws (some louvred hoods snap off) and pull out the lint you can reach, wearing gloves.
- Brush inward. Feed the rotary brush in from outside and work toward the dryer with the drill on forward while someone vacuums at the inside end.
- Clean the flap. Wipe the flap or louvres and the hinge. Each should swing freely and fall shut on its own when the dryer is off, which keeps out cold air, birds and rodents.
- Remove any fine mesh screen. It catches lint and clogs quickly. For a pest guard, use one made for dryer exhaust.
- Reattach the hood with its original screws.
Reconnect and test the airflow
- Slide the transition duct onto the dryer outlet and the wall pipe, tighten both clamps and wrap each joint with foil tape.
- Push the dryer back slowly, checking that the duct does not crush, and leave a few inches behind it.
- Plug the dryer back in and run an air-only or no-heat cycle for about ten minutes to blow out loose lint.
- Go outside while it runs. You should feel a strong, steady stream of air and see the flap open fully.
Choosing the Right Transition Duct
The transition duct, the short connector between the dryer and the wall, gets crushed more than any other part of the system. It is also where we most often find lint packed tight.
- Rigid metal duct. What dryer manufacturers recommend. The smooth inside gives lint little to grab, so use it for runs inside walls and ceilings.
- Semi-rigid metal (aluminum). The practical choice behind the dryer. It bends by hand, holds its shape and resists crushing.
- Foil flexible duct. Only if your dryer manual specifically allows it. The ribs trap lint and it flattens easily.
- Plastic or vinyl duct. Never. Manufacturers say not to use it, yet we still find it in older homes.
Keep the run short and straight. Your dryer manual lists a maximum vent length, and that number shrinks with every elbow. Join sections with clamps and foil tape, not screws, which poke into the duct and snag lint.
Winter: Snow and Ice on the Exterior Dryer Vent
A GTA winter adds a problem a brush cannot fix. Many hoods sit low on the wall, right where snow drifts or gets piled from the driveway. A buried hood leaves the dryer pushing hot, wet air into a dead end.
Ice is the quieter version. Moisture in the exhaust freezes on the flap, so it sticks shut or stays half open. Plastic hoods also turn brittle in the cold and crack when you pry at them.
- Check the hood after every snowfall, and do not pile shovelled snow against that wall.
- Clear snow by hand or with a soft brush, tap ice off gently instead of chipping at it, then run the dryer and confirm the flap opens fully.
- Hoods under a deck, in a narrow side yard or near the ground drift in again and again; moving one is a contractor’s job.
- Ice that keeps coming back can mean lint or a sag is holding moisture in the line, which is a reason to clean it.
When DIY Dryer Vent Cleaning Is Not Enough
A brush kit works on a short run you can reach from both ends. Call a professional for these setups:
- Long runs, especially through a finished basement ceiling, or more than two or three elbows.
- Roof or attic exits. Do not climb onto a roof for a dryer vent. Attic runs also collect condensation in winter, so the lint gets wet and sticks.
- Second-floor laundry with a hood you cannot reach safely from the ground.
- Condos and townhouses with long horizontal runs in ceiling bulkheads or a shared exhaust; ask your property manager how the building handles them. For the unit’s own air ducts, see our condo duct cleaning.
- A brush that stalls, or a nest packed deep in the line.
- Weak airflow at the hood after a full DIY cleaning, which usually means a crushed or disconnected section you cannot see.
Our high-pressure air tools get through bends a brush struggles with. Damage our technicians find, such as a crushed section inside a wall, gets pointed out and photographed.
| Where your dryer is | Posted price | DIY realistic? |
|---|---|---|
| Main floor or basement | $280 | Often, on a short run straight out the wall |
| Second floor | $320 | Inside end only, unless the hood is safe to reach |
| Attic | $480 | Rarely; long, hidden runs and roof exits |
Final prices are confirmed after a brief inspection of length, turns and access. Dryer vent cleaning is priced separately from our air duct cleaning packages, but when the ducts are due too, we can do both on the same visit; compare the duct cleaning packages and prices. See our service areas across Toronto and York Region.
A Comfort Clean customer, Pina G., wrote that our technician was “…determined to find the blockage no matter how long it took; he did and removed it where many had failed.”
Our technicians clear the full run with high-pressure air tools and show you before-and-after photos. See our dryer vent cleaning service or call 905-738-1878.
What We See on the Job
Comfort Clean has been cleaning Toronto homes since 1980, and the same dryer vent problems keep showing up:
- Foil transition ducts crushed flat when the dryer was pushed back.
- A lint plug at the first elbow inside the wall, sometimes pushed there by a forced brush.
- Brush heads and rod sections left in the line after a drill ran in reverse.
- Joints that came apart inside a basement ceiling, dropping lint and moisture between the joists.
- Flaps painted shut, mesh screens packed with lint, and bird nests behind the flap in spring.
- Yellowed, sagging vinyl duct in older houses.
Frequently Asked Questions
Is it better to clean a dryer vent from inside or outside?
Both, if you can reach both ends. Brushing from inside pushes lint out through the open hood, which suits short runs. On longer runs, brushing from each end means each pass covers half the distance and the brush is less likely to pack lint into a plug at an elbow.
Can you clean a dryer vent without moving the dryer?
Only partly. From outside you can clear the hood and brush inward, and from the front you can clean the lint screen housing. The transition duct and the outlet on the back of the dryer collect a lot of lint, though, and you cannot check them for crushing without pulling the dryer out.
Can I clean a dryer vent with a shop vac or a leaf blower?
A shop vac works well on the dryer outlet, the lint trap housing and the first stretch of pipe, but it will not pull packed lint out of a long line. A leaf blower can push loose lint out of a short, straight run with the hood open, but in a ceiling run it can blow apart a loose joint you cannot see.
What is the best dryer vent cleaning kit?
Look for flexible rods that screw together, enough to cover your whole run plus one, a brush head sized for a standard 4-inch duct and a drill adapter. Skip kits with brittle rods, because a rod that snaps inside the wall turns a DIY job into a service call.
How long does it take a professional to clean a dryer vent?
A typical residential dryer vent cleaning takes our technicians 45 to 90 minutes. Short basement runs sit at the low end, while second-floor, attic and roof runs with several turns take longer. Our posted prices are $280 for main floor or basement, $320 for second floor and $480 for attic, confirmed after a brief inspection.
How do I clean the dryer vent in a condo?
Clean the lint screen, vacuum the dryer outlet and clean or replace the transition duct; that part is yours. Many GTA condo dryers vent through a long horizontal run in a ceiling bulkhead or into a building exhaust, which a homeowner kit cannot reach safely. Ask your property manager how the building handles it and when it was last done.