Cleaning your dryer vent annually can not only protect your home from fire, but it can also extend the lifeю. As such, your clothes will dry faster so you will save money on your energy costs. But how many of us actually know how to clean it without professional assistance?
The following blog will provide step-by-step information for safe dryer vent cleaning. We shall also advise you on how to tell when your vents need to be cleaned. It is recommended to have both your HVAC vents cleaned annually by a reputable cleaning team.
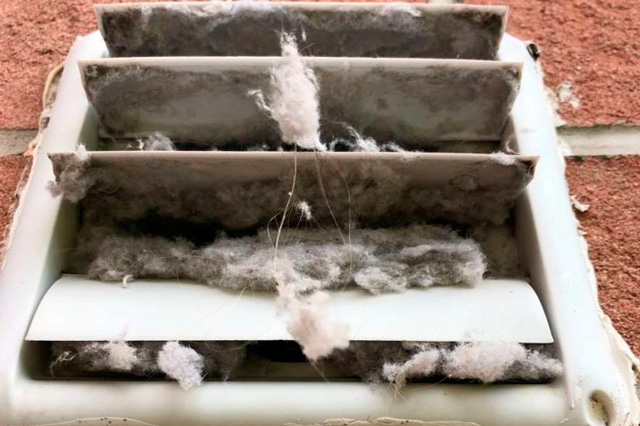
Signs It’s Time to Clean Your Vent
Use the following telltale signs to determine when it is time to clean your vent.
- Lint is blocking the hood flap of If you are having trouble opening the dryer vent flap, it could be due to a back-up of dryer lint. If this is not resolved, it could be a fire hazard. Dryer fires are one of the leading causes of house fires. Vent cleaning can greatly decrease this risk.
- You notice a musty smell in your laundry room: In addition to lint, things like mold, mildew, dust, and other debris tend to get trapped in the vents. This can cause a musty smell and even lead to serious mold issues, which are bad for your health.
- It smells like your clothes are burning: Have you noticed that your dryer or clothes have a burnt or smokey smell. This is a serious indication that a dryer fire can occur. If there is an excessive accumulation of lint, dust, etc, it is a definite fire hazard.
- Your clothes are not drying efficiently: Is your dryer taking longer than usual to fully dry your clothes. Clogged vents prevent the dryer from working as it should.
- Increase in Heating Costs: Is your electric bill higher than usual for no obvious reason? Vents that are clogged cause the dryer to work twice as hard to work. This causes an increase in heating costs as well as additional wear and tear on your clothes dryer.
How to Clean Dryer Vent
Step 1: The first thing you need to do is clean the lint trap on the dryer. You should be doing this after each cycle. However, cleaning the trap itself should be a part of the vent cleaning process.
All you need to do is remove the trap and remove the lint from the trap itself. Next, use a clean soft-bristled toothbrush and warm, soapy water to remove any stubborn lint. Let it dry completely before replacing the lint trap.
Step 2: The vent to the lint trap tends to collect a lot of dust and other debris. Using a flexible appliance brush, carefully remove any lint, etc remaining in the vent. If you unplug the dryer, you can also use a vacuum cleaner brush attachment to remove any loose dust.
Step 3: Unplug the dryer from the wall unit and carefully move away from the wall. Next, disconnect and use the appliance brush to clean any lint, dust, and other debris from it.
Step 4: Using the applicant brush, remove any dirt and debris from the outside vent hood trap.
Step 5: Move back in place and plug it back in.
Step 6: Use a dust mop and broom or vacuum to clean up any residue from the laundry room.
Professional dryer vent cleaning is recommended in order to fully clean your system. A certified cleaning team will possess the right tools to thoroughly clean the dryer vent system in its entirety. Even if you regularly clean your vents, you should have them cleaned annually by a professional cleaning service.
If you need more advice on how to clean the dryer vent, contact Comfort Clean. Our expert staff can advise you on the proper steps. As well, we can give you a free quote for a professional dryer vent and air duct cleaning. Call us today to schedule an appointment for professional vent cleaning for your home or business.